
How to Substitute Masking Scotch?
The purpose of masking is to protect areas of a part from surface treatment. In general, masking is a long and arduous operation that requires handling and a lot of adhesive.
Adhesive is the most widely used masking tool in the industry, yet it is far from being the most practical and suitable.
Indeed, the scotch requires manual insertion and is not reusable. However, no alternative seems to be available, so how can it be substituted?
What is Masking?
If you have arrived on this page, you probably know what masking is, but let’s remind you to visualize the objectives followed.
When you have to treat a part (painting, sanding, chemical treatment, etc.) it is very common to have to spare one or more areas of the treatment.
This operation makes it possible to treat only the areas concerned.
The easiest way to install this partial room protection is to use an adhesive that is applied to the surfaces to be spared.
The adhesive has the advantage of adhering to the surface. It is partly for this reason (and also its price) that it is widely used. It is reliable and practical enough to do what it is asked to do.
Why replace marking tape?
But if masking tape meets our needs, why would we want to replace it?
Indeed, the scotch meets the needs, it protects the areas to be saved (not always perfectly, but we’ll come back to this later).
That’s why most companies around the world use adhesives for protection against surface treatments.
However, masking tape has many flaws and many of its users are looking for alternatives.
Among the biggest problems are :
- Handling: The tape must be placed, by hand, piece by piece. This is a repetitive process that is expensive in labor and very time consuming.
- Single use: Once the part has been treated, the masking must be removed. It is not repeatable from one part to another, you must always start from scratch.
- Price: Although scotch is not very expensive on its own, the two reasons stated above make it a very expensive masking technique.
- Efficiency: It is obvious that placing a masking tape is not very accurate and it is not uncommon for the tape not to work as intended and damage the part.
As you have understood, these problems are very damaging for the companies, especially if you damage parts during the process.
For all these reasons, companies are increasingly looking for alternatives to adhesives that are cheaper and easier to apply.
Plastiform Solutions
Faced with these issues encountered by many of our partners, we decided to put Plastiform products to the test of masking.
Unlike adhesives, plastiforms can be molded to the shape of the part. This is particularly interesting for creating custom molds that can accommodate multiple parts.
Thus, you increase your productivity tenfold, since you perform a single handling operation for several parts.
This operation is sometimes longer than putting tape on the surface of the part, but since the molds are reusable, you will save a lot of handling time in the long run!

Protective mould
And this is not the only advantage of plastiforms for the protection of parts.
Most surface treatments do not damage the plastiform mold, making it a formidable reusable protective tool.
In short, Plastiform gives you big advantages:
- The mold is reusable several times and protects several parts at the same time,
- The resolution of the moulds is close to one micron, and the product adheres to the surface (like a suction cup). This ensures the effectiveness of the mold with respect to its protective mission.
- Molds can be flexible to easily extract even complex parts.
Molds made with Plastiform products are thus great tools to replace adhesives and fill many of their defects, especially since with micron resolution they are more efficient than simple scotches.
Adhesive substitution with Plastiform
Plastiform is a viable alternative to masking tapes, but how is it implemented?
Well, it’s quite simple, in the idea, you have to put a mold or point protections on your parts.
Different moulds types
Plastiform allows the installation of different types of protective moulds. Each mold is suitable for particular applications and it is necessary to determine which is the right solution for your problem.
That being said, some molds are much more used than others.
It is not uncommon to come across similar applications, and this is the case for many companies that share the same problems with masking.
Here are some examples of widely used molds. They cover more than 90% of the problems we encounter in part masking:
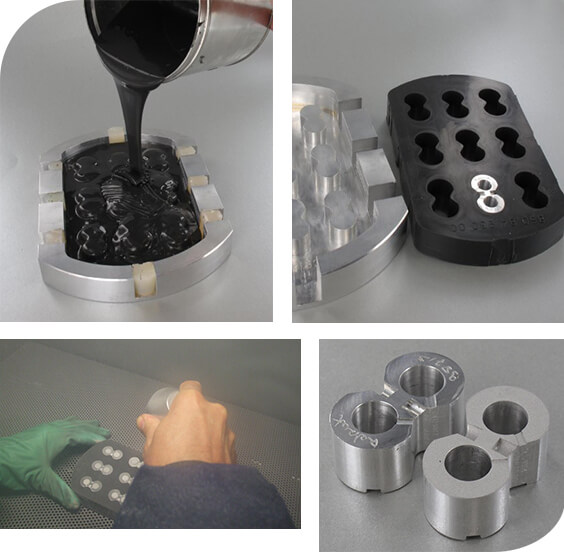
Multi-piece protection mold against sandblasting
This mould is a plastiform block that can accommodate a large number of small parts.
The idea with this mould is to treat surfaces by pushing the rest of the part into the mould.
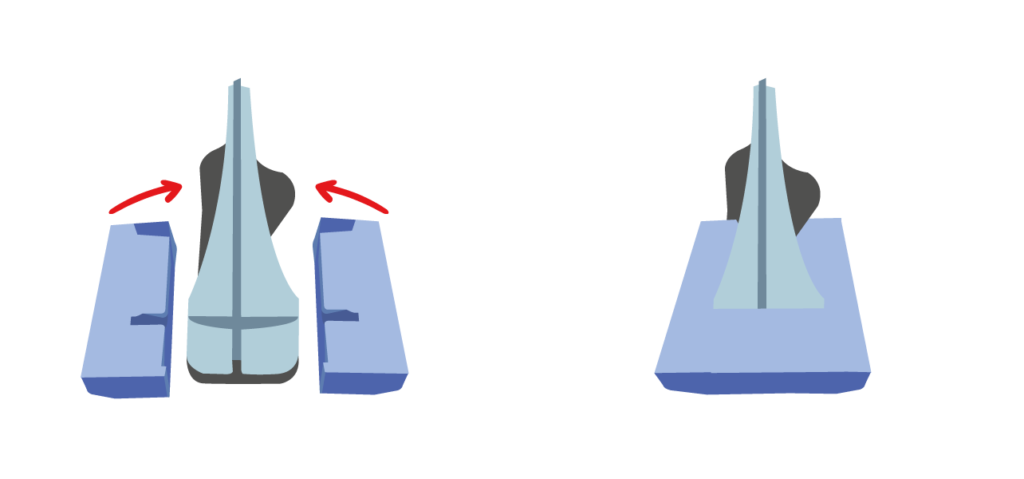
Illustration of a two-part protective mould
This mold is him, much more technical!
It is generally used for very complex parts of which you want to protect only a part.
This mold is in two parts, to fix it, you have to close it on the piece and fix it there.
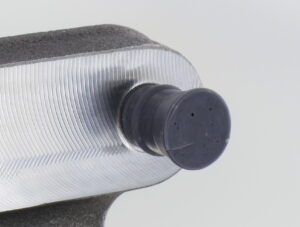
Plug to protect a thread
It is not a mold, but plugs / point protections.
These protections are put in place on a case-by-case basis and are not always reusable, but they have the advantage of being more practical to apply than tape and, above all, much more precise.
Setting up a protective mold with Plastiform
Creating the mold is the most complicated step because it requires set-up.
But what’s a few minutes of ingenuity versus hours of intensive taping?
We will not deal here with the case of punctual protections since they can be applied in the same way as for a classic Plastiform impression.
Let’s distinguish between two cases: The multi-piece protection mold and the complex shape protection mold.
In the first case, it is generally quite simple to make the mold. It is moreover realizable in 3 steps:
- First step. Find the right product. In general, your choice will be the F30 XL if you need flexibility, or the F50 XL and F70 XL if you need a little more stiffness.
- Second step. Find a container of the desired mold size. Then fill it with 2 to 5 cm of product and let it harden for 35 minutes.
- Last step. Position the parts on the Plastiform surface. Leave only the surface to be treated facing upwards and run more product until all areas to be protected are covered.
Done!
All you have to do is leave the product to polymerize quietly for at least 35 minutes and you will get your mold. With it you will be able to easily extract the treated parts and replace them with the next ones.
Let’s move on to the second case, which is more complex to set up.
These molds are very situational and encompass the part on a specific area to be protected.
Their installation therefore requires forming a mould in two parts with an area on each side (of each part of the mould) where you will clamp them against the part.
To make this type of mold you have two options:
- The first one is not to make the mold yourself and to contact one of our experts to take care of it.
- The second is to make a mold as indicated for the previous mold, taking care to split it in two.
If you choose the second option, the most complex step is to provide the clamping mechanism in the mold. Be sure to study your mold carefully before attempting to make it.
Conclusion
Here you are at the end of a crazy adventure in search of an alternative solution to traditional masking techniques.
As we have seen, tape-based masking has many drawbacks: it is expensive, time-consuming, inaccurate and requires a lot of handling.
On the other hand, custom molds can be very effective in providing protection against surface treatments.
Questions about how it works? Leave us a note!